NeoVim
OCP Viewer works with any editor that can run Python and reach the viewer over its local port. This page walks through setting up NeoVim as a full CAD workstation:
- a Python REPL to send code to
- a file tree
- LSP completion
- visual debugging that mirrors the VS Code experience by pushing every CAD object in
locals()to the viewer on each debugger step.
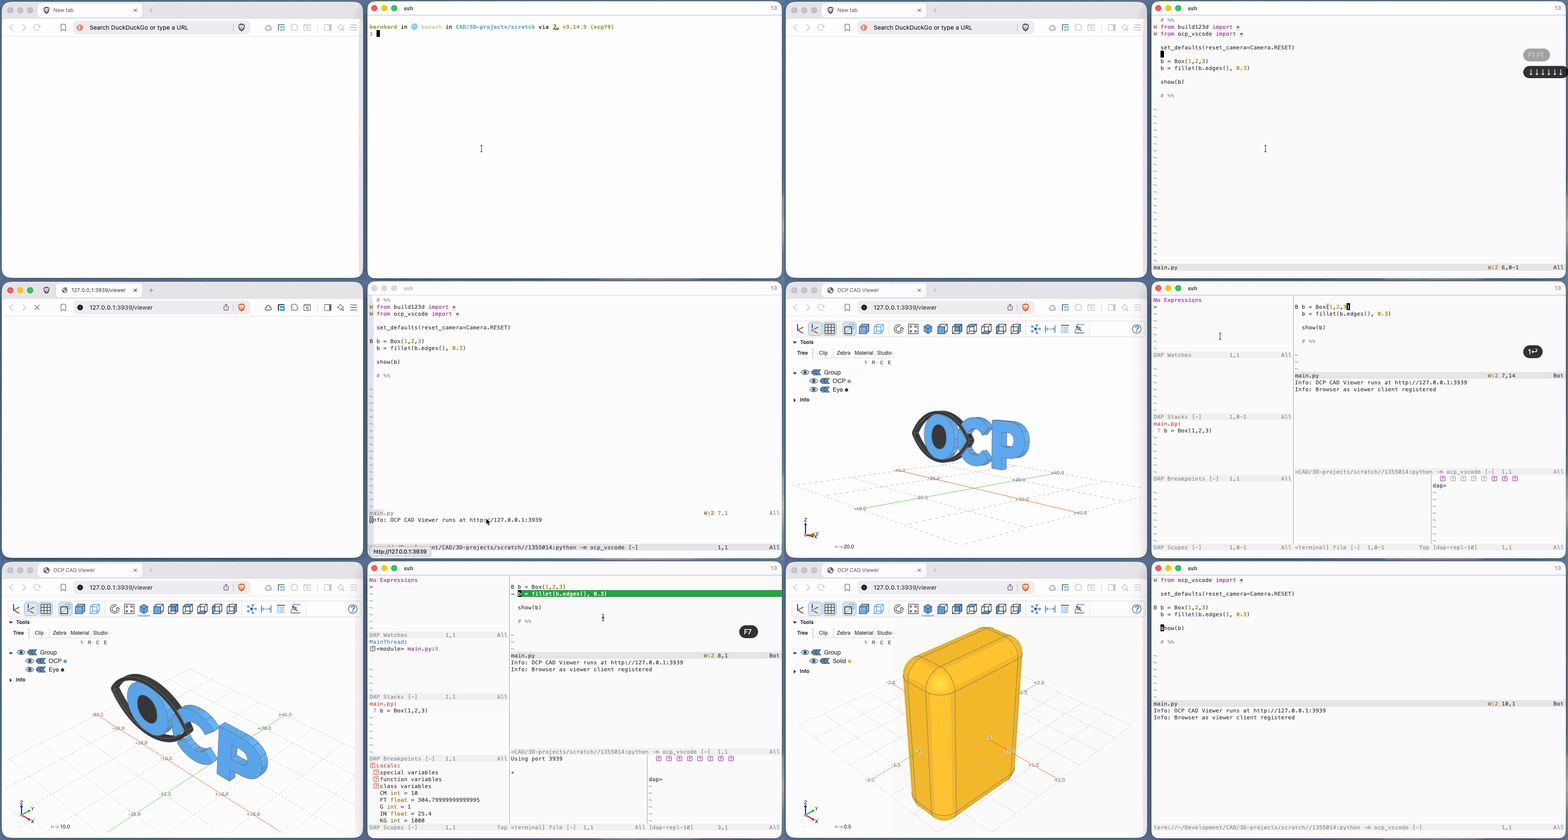
The configuration below is built up plugin by plugin. By the end you will have a NeoVim config directory that you can extend further. All snippets together are equivalent to running a single bootstrap script, but going through them one at a time makes it clear what each piece does.
The setup is identical on macOS, Linux and Windows — only the config directory location and the install commands for the external tools differ. Those differences are called out below.
Where NeoVim looks for its config. NeoVim reads init.lua from its standard config directory. Throughout this page that directory is written as ~/.config/nvim; substitute your platform's location:
| Platform | Config directory |
|---|---|
| macOS / Linux | ~/.config/nvim |
| Windows | %LOCALAPPDATA%\nvim |
On Windows the same init.lua / lua/... layout applies, just under %LOCALAPPDATA%\nvim (i.e. %USERPROFILE%\AppData\Local\nvim). You can always confirm the path from inside NeoVim with :echo stdpath("config").
Typical workflow
Once the configuration described below is in place, a typical editing session looks like this. The keys in parentheses are the mappings set up in the following sections.
- Activate your Python environment — the one that has
ocp_viewer(andbuild123d/cadquery, plusdebugpyfor visual debugging) installed. - Launch NeoVim in your project, either on a directory (
nvim .) or directly on a file (nvim file.py). - Pick a file — if you opened with
nvim ., focus the file tree (<F1>), move the cursor to the file and press<Enter>(or just click it). See File tree. - Start the viewer:
- a. In NeoVim, press
<Esc>then,vsto start it in a bottom terminal split. See Starting the viewer from NeoVim. - b. Open it in your browser using the URL printed in that terminal (e.g.
http://127.0.0.1:3939; over SSH usehttp://localhost:3939through your port-forward).
- a. In NeoVim, press
- Edit your file. If you want to work cell-by-cell through the Python REPL, mark cells with
# %%. - Run your code:
- a. REPL: put the cursor in a cell and press
<F4>to send it to the REPL and advance to the next cell (the REPL opens on first use). See Iron REPL. - b. Debugger: save with
<Esc>then:w, then press<F5>and choose option1to run the current file. Set breakpoints with<F8>to inspect CAD objects at each step. See Visual Debugging Support.
- a. REPL: put the cursor in a cell and press
Viewer
The viewer itself runs separately. Start it in OCP Viewer (python -m ocp_viewer) or inside VS Code, then point your show* / show_all calls at its port. NeoVim only needs to send Python to a REPL and, for debugging, evaluate an expression in the paused frame.
Starting the viewer from NeoVim
The viewer is a long-running server, so it must be started in a way that does not block the editor:
- Do not use
:!python -m ocp_viewer—:!runs synchronously and freezes NeoVim until the process exits, which for a server never happens. -
Use a terminal buffer instead, which keeps the server alive in its own window while you switch back to your code:
:botright 4split | terminal python -m ocp_viewerPress
<C-\><C-n>to leave terminal-insert mode and<C-w>wto jump back to your file. Closing the buffer (:bd!) stops the server. -
Or run it as a detached background job (no visible window):
:lua vim.fn.jobstart({ "python", "-m", "ocp_viewer" }, { detach = true })
[!WARNING] Which Python?
:terminalandjobstartinherit NeoVim's environment, not the venv your REPL/debugger uses. Thepythonthey run must be the interpreter that hasocp_viewerinstalled. Either launchnvimfrom an already-activated environment, or give the full path, e.g.terminal /path/to/venv/bin/python -m ocp_viewer.
For convenience, this is bound to ,vs in the base init.lua (see Base settings); it uses the leader key defined there.
Remote (SSH) viewing. The viewer binds to 127.0.0.1, which is unreachable from your local machine when NeoVim runs on a remote host. Rather than exposing the server to the network with --host, forward the port over your SSH connection:
ssh -L 3939:localhost:3939 user@host
Then start the viewer normally (it stays on 127.0.0.1) and open http://localhost:3939 in your local browser — the connection is tunnelled through SSH, so nothing is exposed beyond your machine.
[!NOTE]
channel N: open failed: connect failed: Connection refused— if the SSH session prints this repeatedly, it is harmless. It means the tunnel is up but nothing is listening onlocalhost:3939on the remote — typically because you stopped the viewer (e.g. withCtrl-C) while a browser tab is still open and auto-reconnecting to it. Close that browser tab, or restart the viewer so the port has a listener again. To silence the messages, connect withssh -o LogLevel=ERROR -L 3939:localhost:3939 user@host.
Key mapping:
,vs— start the OCP Viewer in a bottom terminal split
Prerequisites
-
NeoVim ≥ 0.11 (
nvim --version). The config usesvim.uvand modern Lua APIs; older NeoVim versions will not work. -
Git:
giton yourPATH— the plugin manager clones itself and every plugin with it. -
lazy.nvim is used as the plugin manager (other plugin managers might also work). Note: You do not install it by hand: the
lua/config/lazy.luasnippet below bootstraps (git-clones) it on first launch and keeps it updated. It is listed here as a prerequisite because everything else in this guide is expressed as lazy.nvim plugin specs.Why lazy.nvim? It is declarative (one Lua file per plugin, no imperative install steps), lazy-loads plugins so startup stays fast, auto-installs anything missing on first launch, and pins exact plugin versions in a
lazy-lock.jsonlockfile — the same supply-chain hygiene you'd want from any package manager. Updates and a health overview are one:Lazyaway. -
Python: Ensure debugpy is installed in your Python environment if you plan to use visual debugging
-
Mouse support: NeoVim's mouse mode is enabled in
init.luabelow, but your terminal must forward mouse events. On macOS with iTerm2, turn mouse reporting on. Most Linux terminals (GNOME Terminal, Konsole, Alacritty, kitty, WezTerm) and Windows Terminal forward mouse events by default.
Base installation
The sections below configure an opinionated set of key mappings. Feel free to cahnge to your own liking.
External tool installation
Install the external command-line tools before starting NeoVim for the first time, so the plugins can build themselves on first launch.
-
macOS (Homebrew):
brew install neovim git tree-sitter-cli ripgrep -
Linux:
# Debian / Ubuntu sudo apt install neovim git ripgrep # tree-sitter CLI (not packaged everywhere): via npm or cargo npm install -g tree-sitter-cli # or: cargo install tree-sitter-cli # Fedora sudo dnf install neovim git ripgrep # Arch sudo pacman -S neovim git ripgrep tree-sitter-cli -
Windows:
Use for example Scoop or Chocolatey in an administrative Powershell:
scoop install neovim git ripgrep tree-sitter
# or
choco install neovim git ripgrep
Directory layout
The configuration follows the standard lazy.nvim structure: a single init.lua plus one file per plugin under lua/plugins/. Create the folders first:
-
macOS / Linux:
mkdir -p ~/.config/nvim/lua/config mkdir -p ~/.config/nvim/lua/plugins touch ~/.config/nvim/init.lua \ ~/.config/nvim/lua/config/lazy.lua \ ~/.config/nvim/lua/plugins/ironRepl.lua \ ~/.config/nvim/lua/plugins/neo-tree.lua \ ~/.config/nvim/lua/plugins/nvim-dap-python.lua \ ~/.config/nvim/lua/plugins/nvim-dap-ui.lua \ ~/.config/nvim/lua/plugins/nvim-lspconfig.lua \ ~/.config/nvim/lua/plugins/onedark.lua \ ~/.config/nvim/lua/plugins/treesitter.lua -
Windows (PowerShell):
mkdir $env:LOCALAPPDATA\nvim\lua\config
mkdir $env:LOCALAPPDATA\nvim\lua\plugins

"init.lua",
"lua\config\lazy.lua",
"lua\plugins\ironRepl.lua",
"lua\plugins\neo-tree.lua",
"lua\plugins\nvim-dap-python.lua",
"lua\plugins\nvim-dap-ui.lua",
"lua\plugins\nvim-lspconfig.lua",
"lua\plugins\onedark.lua",
"lua\plugins\treesitter.lua" |
    ForEach-Object { New-Item -ItemType File -Force "$env:LOCALAPPDATA\nvim\$_" }
When you are done the config directory looks like this (shown for macOS/Linux; the same layout lives under %LOCALAPPDATA%\nvim on Windows):
~/.config/nvim
├── init.lua
└── lua
    ├── config
    │   └── lazy.lua
    └── plugins
        ├── ironRepl.lua
        ├── neo-tree.lua
        ├── nvim-dap-python.lua
        ├── nvim-dap-ui.lua
        ├── nvim-lspconfig.lua
        ├── onedark.lua
        └── treesitter.lua
Base settings
Config file: init.lua
init.lua sets a few editor options and then hands control to the plugin manager. Mouse support makes pane resizing and tree clicks work; the leader keys define the prefix for all the custom key bindings used below. The ,vs mapping is a convenience for starting the viewer (see Starting the viewer from NeoVim); it must be defined after mapleader so <leader> expands to ,.
-- ~/.config/nvim/init.lua
vim.opt.mouse = "a"
vim.g.mapleader = ","
vim.g.maplocalleader = " "

-- Start the OCP Viewer in a bottom split (must be after mapleader is set)
vim.keymap.set("n", "<leader>vs", "<cmd>botright 4split | terminal python -m ocp_viewer<cr>",
  { desc = "Start OCP Viewer" })

-- In a terminal window, press Esc to leave terminal-insert mode (see
-- "Moving between windows" below)
vim.keymap.set("t", "<Esc>", "<C-\\><C-n>", { desc = "Terminal: to normal mode" })

require("config.lazy")
Key mappings:
,— leader key (the prefix for all the,-based mappings below)<Space>— local leader key,vs— start the OCP Viewer in a bottom terminal split<Esc>(in a terminal window) — leave terminal-insert mode
Bootstrapping the plugin manager
Config file: lua/config/lazy.lua
This is the standard lazy.nvim bootstrap. On first launch it clones lazy.nvim into NeoVim's data directory and then loads every spec found under lua/plugins/.
-- ~/.config/nvim/lua/config/lazy.lua
-- Bootstrap lazy.nvim
local lazypath = vim.fn.stdpath("data") .. "/lazy/lazy.nvim"
if not (vim.uv or vim.loop).fs_stat(lazypath) then
  local lazyrepo = "https://github.com/folke/lazy.nvim.git"
  local out = vim.fn.system({ "git", "clone", "--filter=blob:none", "--branch=stable", lazyrepo, lazypath })
  if vim.v.shell_error ~= 0 then
    vim.api.nvim_echo({
      { "Failed to clone lazy.nvim:\n", "ErrorMsg" },
      { out, "WarningMsg" },
      { "\nPress any key to exit..." },
    }, true, {})
    vim.fn.getchar()
    os.exit(1)
  end
end
vim.opt.rtp:prepend(lazypath)

-- Setup lazy.nvim
require("lazy").setup({
  spec = {
    -- import your plugins
    { import = "plugins" },
  },
  -- colorscheme that will be used when installing plugins.
  install = { colorscheme = { "habamax" } },
  -- automatically check for plugin updates
  checker = { enabled = true },
  rocks = { enabled = false }
})
Usability installations
These plugins make NeoVim comfortable to work in. None of them are CAD-specific, but they round out the environment around the REPL and debugger.
Iron REPL — sending code to Python
Config file: lua/plugins/ironRepl.lua
You want to edit your preferred shell under -- Pick the shell REPL based on the OS
Iron gives you an interactive Python REPL in a split and lets you send the current block, line, or selection to it. This is the everyday workflow for OCP CAD Viewer: keep python (or ipython) running, show() an object, edit, and re-send a block to update the viewer.
Note the block dividers # %% / #%% — split your script into cells with those markers and use <F4> to send a whole cell and advance to the next one.
-- ~/.config/nvim/lua/plugins/ironRepl.lua
return {
  'Vigemus/iron.nvim',
  config = function()
    local iron = require("iron.core")
    local view = require("iron.view")
    local common = require("iron.fts.common")

    -- Pick the shell REPL based on the OS
    local shell
    if vim.fn.has("win32") == 1 then
      shell = "powershell"  -- Windows
    elseif vim.fn.has("mac") == 1 then
      shell = "zsh"         -- macOS
    else
      shell = "bash"        -- Linux
    end

    iron.setup {
      config = {
        -- Whether a repl should be discarded or not
        scratch_repl = true,
        -- Your repl definitions come here
        repl_definition = {
          sh = {
            -- Shell REPL (optional); `shell` is set per-OS above
            command = { shell }
          },
          python = {
            command = { "python" },  -- or { "ipython", "--no-autoindent" }
            format = common.bracketed_paste_python,
            block_dividers = { "# %%", "#%%" },
          }
        },
        -- set the file type of the newly created repl to ft
        repl_filetype = function(bufnr, ft)
          return ft
        end,
        -- How the repl window will be displayed
        repl_open_cmd = view.split.botright("20%")
      },
      -- Iron doesn't set keymaps by default anymore.
      keymaps = {
        toggle_repl = "<leader>rr", -- toggles the repl open and closed.
        restart_repl = "<leader>rR", -- calls `IronRestart` to restart the repl
        send_motion = "<leader>sc",
        visual_send = "<leader>sc",
        send_file = "<leader>sf",
        send_line = "<leader>sl",
        send_paragraph = "<leader>sp",
        send_until_cursor = "<leader>su",
        send_mark = "<leader>sm",
        send_code_block = "<leader>sb",
        send_code_block_and_move = "<leader>sn",
        mark_motion = "<leader>mc",
        mark_visual = "<leader>mc",
        remove_mark = "<leader>md",
        cr = "<leader>s<cr>",
        interrupt = "<leader>s<leader>",
        exit = "<leader>sq",
        clear = "<leader>cl",
      },
      highlight = {
        italic = true
      },
      ignore_blank_lines = true, -- ignore blank lines when sending visual select lines
    }

    -- iron also has a list of commands, see :h iron-commands for all available commands
    vim.keymap.set('n', '<leader>rf', '<cmd>IronFocus<cr>')
    vim.keymap.set('n', '<leader>rh', '<cmd>IronHide<cr>')
    vim.keymap.set('n', '<F3>', '<cmd>IronRepl<cr>')
    vim.keymap.set('n', '<S-F3>', '<cmd>IronRestart<cr>')
    vim.keymap.set('n', '<F4>', function() require'iron.core'.send_code_block(true) end, { desc = 'Iron send block and move' })
    vim.keymap.set('n', '<S-F4>', function() require'iron.core'.send_code_block(false) end, { desc = 'Iron send block and stay' })
  end
}
Key mappings:
F3— open the REPLShift+F3— restart the REPLF4— send the current code block and move to the next oneShift+F4— send the current code block and stay,rf— focus the REPL window,rh— hide the REPL window,rr— toggle the REPL open/closed,rR— restart the REPL,sc— send motion / visual selection,sf— send the whole file,sl— send the current line,sp— send the current paragraph,su— send from start up to the cursor,sb— send the current code block,sn— send the current code block and move,sm— send to a mark,mc— mark motion / visual selection,md— remove a mark,s<CR>— send a carriage return to the REPL,s,— interrupt the REPL (Ctrl-C),sq— exit the REPL,cl— clear the REPL
File tree
Config file: lua/plugins/neo-tree.lua
neo-tree provides the file explorer, buffer list and git status view, all toggled from <F1>.
-- ~/.config/nvim/lua/plugins/neo-tree.lua
return {
  "nvim-neo-tree/neo-tree.nvim",
  branch = "v3.x",
  dependencies = {
    "nvim-lua/plenary.nvim",
    "MunifTanjim/nui.nvim",
    "nvim-tree/nvim-web-devicons", -- optional, but recommended
  },
  lazy = false, -- neo-tree will lazily load itself
  ---@module 'neo-tree'
  ---@type neotree.Config
  opts = {
    -- options go here
  },
  config = function ()
    require('neo-tree').setup({
      window = {
        mappings = {
          ['e'] = function() vim.api.nvim_exec('Neotree focus filesystem left', true) end,
          ['b'] = function() vim.api.nvim_exec('Neotree focus buffers left', true) end,
          ['g'] = function() vim.api.nvim_exec('Neotree focus git_status left', true) end,
          ['<F1>'] = function() vim.api.nvim_exec('Neotree close', true) end,
        },
      },
    })
    vim.keymap.set("n", "<F1>", "<cmd>Neotree focus<cr>", { desc = "Neotree Focus" })
  end
}
Key mappings:
F1— focus the tree (from any window)F1(inside the tree) — close the treee(inside the tree) — switch to the filesystem viewb(inside the tree) — switch to the buffers viewg(inside the tree) — switch to the git status view
Syntax highlighting
Config file: lua/plugins/treesitter.lua
nvim-treesitter provides accurate syntax highlighting and the code-block detection Iron relies on. :TSUpdate runs on install (this is why the tree-sitter-cli prerequisite matters).
-- ~/.config/nvim/lua/plugins/treesitter.lua
return {
  {
    "nvim-treesitter/nvim-treesitter",
    branch = 'master',
    lazy = false,
    build = ":TSUpdate"
  }
}
Language server & completion
Config file: lua/plugins/nvim-lspconfig.lua
nvim-lspconfig together with mason and nvim-cmp gives you Python (pyright) completion, hover docs and go-to-definition — handy when exploring the build123d / CadQuery APIs.
-- ~/.config/nvim/lua/plugins/nvim-lspconfig.lua
return {
  "neovim/nvim-lspconfig",
  dependencies = {
    "williamboman/mason.nvim",
    "williamboman/mason-lspconfig.nvim",
    "hrsh7th/nvim-cmp",
    "hrsh7th/cmp-nvim-lsp",
    "L3MON4D3/LuaSnip",
    "saadparwaiz1/cmp_luasnip",
  },
  config = function()
    require("mason").setup()
    require("mason-lspconfig").setup({
      ensure_installed = { "pyright", "ts_ls" },
      -- You can also add more servers here
    })

    -- Neovim 0.11+ LSP API. Server configs ship with nvim-lspconfig as
    -- runtime `lsp/<name>.lua` files; we only add the completion capabilities
    -- (shared by every server) and then enable the servers we want.
    local capabilities = require("cmp_nvim_lsp").default_capabilities()
    vim.lsp.config("*", { capabilities = capabilities })
    -- Per-server overrides go via vim.lsp.config("pyright", { ... })
    vim.lsp.enable({ "pyright", "ts_ls" })

    local cmp = require("cmp")
    cmp.setup({
      mapping = cmp.mapping.preset.insert({
        -- preset.insert already maps <Up>/<Down> (and <C-p>/<C-n>) to move
        -- through the menu and <C-e> to dismiss it; we add <CR> to confirm.
        ["<CR>"] = cmp.mapping.confirm({ select = true }),
      }),
      sources = {
        { name = "nvim_lsp" },
        { name = "luasnip" },
        -- more sources as needed
      },
    })

    -- Buffer-local key mappings, set once a server attaches to a buffer
    vim.api.nvim_create_autocmd("LspAttach", {
      callback = function(args)
        local bufnr = args.buf
        vim.keymap.set("n", "gd", vim.lsp.buf.definition, { buffer = bufnr })
        vim.keymap.set("n", "K", vim.lsp.buf.hover, { buffer = bufnr })
        -- etc.
      end,
    })
  end
}
Key mappings (active in buffers with an attached language server):
gd— go to definitionK— show hover documentation
Completion menu (nvim-cmp, while the popup is open):
<Down>/<Up>— move to the next / previous suggestion<C-n>/<C-p>— same as<Down>/<Up><Enter>— confirm and insert the highlighted suggestion<C-e>— dismiss the menu
Theme
Config file:lua/plugins/onedark.lua
onedark provides a light/dark theme that toggles with <F2>.
-- ~/.config/nvim/lua/plugins/onedark.lua
return {
  {
    "navarasu/onedark.nvim",
    priority = 1000,          -- load before all other start plugins
    config = function()
      require('onedark').setup {
        style = 'light',       -- initial default, can be 'light', 'warmer', etc.
        toggle_style_key = "<F2>",  -- binds <F2> to toggle between styles
        toggle_style_list = { 'dark', 'light' }, -- specify which styles to toggle
      }
      require('onedark').load()     -- activates the theme
    end,
  },
}
Key mappings:
F2— toggle between the light and dark style
Moving between windows
With the file tree, editor and a terminal split open, you move between them with NeoVim's window (<C-w>) commands — hold Ctrl, press w, then a direction:
<C-w>h/<C-w>j/<C-w>k/<C-w>l— move to the window left / down / up / right<C-w>w— cycle to the next window (<C-w>Wcycles backwards)<C-w>p— jump to the previous (last-used) window
Your plugin bindings also jump straight to specific windows: <F1> focuses the file tree and ,rf focuses the Iron REPL.
Getting out of a terminal window
A :terminal buffer (e.g. the viewer started with ,vs) opens in terminal-insert mode, where every keystroke — including <C-w> — is sent to the running process instead of NeoVim. So <C-w> does nothing until you first leave that mode:
- Press
<C-\><C-n>(holdCtrl, press\, thenn) to drop into terminal-normal mode. The process keeps running. - Or press
<Esc>— the baseinit.luamaps it to the same thing (see below).
This only changes mode, it does not move you to another window — you are still in the terminal. To reach the editor, follow it with a window motion, e.g. <C-w>k (move up) or <C-w>w (cycle). So the full "get me back to my code" sequence is <Esc> then <C-w>k.
To type into the shell again, focus the terminal window and press i or a.
The <Esc> mapping that makes this less awkward:
-- press Esc to exit terminal-insert mode
vim.keymap.set("t", "<Esc>", "<C-\\><C-n>", { desc = "Terminal: to normal mode" })
[!NOTE] This remaps
<Esc>inside every terminal buffer, so it is intercepted by NeoVim instead of reaching programs running in the terminal (a TUI, oripythonin vi-mode). For a terminal that only runs the viewer server that is harmless; remove the mapping if you run interactive programs that need<Esc>.
Using the mouse
Because vim.opt.mouse = "a" is set in init.lua, you can also switch windows with the mouse:
- Click any window (tree, editor or terminal) to focus it — no
<C-\><C-n>needed to leave the terminal this way. - Drag a window border to resize.
- The scroll wheel scrolls the window under the pointer.
This requires your terminal emulator to forward mouse events (see the Mouse support note under Prerequisites). Clicking into a terminal window focuses it but stays in normal mode — press i/a to type at the shell.
[!TIP] Over SSH: the mouse is handled by your local terminal emulator, so it still works when you edit on a remote host — the clicks are forwarded down the SSH connection. Just make sure mouse reporting is enabled locally (in iTerm2: Settings → Profiles → Terminal → "Enable mouse reporting", also reachable from View → Enable Mouse Reporting). If NeoVim runs inside tmux on the remote host, also add
set -g mouse onto its~/.tmux.conf. With reporting on, hold Option (iTerm2) to do a local text selection instead of sending the click to NeoVim.
Visual Debugging Support
This is the part that makes NeoVim a first-class OCP Viewer client. Using the Debug Adapter Protocol, every time the debugger stops on a line, NeoVim evaluates an expression in the paused frame that pushes all CAD objects in locals() to the viewer — the same behavior as visual debugging in VS Code, where objects appear in the viewer labeled with their variable names as you step.
The key line is the evaluate request:
from ocp_viewer import show_all, get_port; show_all(locals(), port=get_port())
get_port() discovers the running viewer's port, and show_all(locals()) renders every CAD object currently in scope. Because it runs on the event_stopped listener, it fires automatically on every step and breakpoint.
DAP for Python
Config file: lua/plugins/nvim-dap-python.lua
-- ~/.config/nvim/lua/plugins/nvim-dap-python.lua
return {
  {
    "mfussenegger/nvim-dap-python",
    config = function()
      require("dap-python").setup("python")
      require("dapui").setup()

      --Configure DAP providers
      vim.g.loaded_perl_provider = 0
      vim.g.loaded_ruby_provider = 0

      local dap, dapui = require("dap"), require("dapui")

      dap.listeners.before.attach.dapui_config = function()
        dapui.open()
      end
      dap.listeners.before.launch.dapui_config = function()
        dapui.open()
      end
      dap.listeners.before.event_terminated.dapui_config = function()
        dapui.close()
      end
      dap.listeners.before.event_exited.dapui_config = function()
        dapui.close()
      end

      -- On every stop, push all CAD objects in the paused frame to the viewer
      dap.listeners.after.event_stopped['AutoShowAllLocals'] = function(session, body)
        if body and body.threadId then
          session:request('stackTrace', {
            threadId = body.threadId,
            startFrame = 0,
            levels = 1,
          }, function(err, response)
            if err then
              vim.notify('DAP stackTrace error: ' .. vim.inspect(err), vim.log.levels.ERROR)
              return
            end
            local frames = response and response.stackFrames
            if frames and frames[1] then
              local frameId = frames[1].id
              session:request('evaluate', {
                expression = 'from ocp_viewer import show_all, get_port; show_all(locals(), port=get_port())',
                frameId = frameId,
                context = 'repl',
              }, function(e, resp)
                if e then
                  vim.notify('DAP eval error: ' .. vim.inspect(e), vim.log.levels.ERROR)
                end
              end)
            else
              vim.notify("error:" .. vim.inspect(response), vim.log.levels.ERROR)
            end
          end)
        else
          vim.notify('No threadId in event_stopped body!', vim.log.levels.ERROR)
        end
      end

      vim.keymap.set("n", "<F5>", dap.continue, { desc = "Debug: Continue" })
      vim.keymap.set("n", "<F8>", dap.toggle_breakpoint, { desc = "Debug: Toggle Breakpoint" })
      vim.keymap.set("n", "<F7>", dap.step_over, { desc = "Debug: Step Over" })
      vim.keymap.set("n", "<F6>", dap.step_into, { desc = "Debug: Step Into" })
      vim.keymap.set('n', '<leader>dt', function() require'dap'.terminate() end, { desc = 'DAP Terminate' })
    end
  }
}
Key mappings:
F5— continueF8— toggle breakpointF7— step overF6— step into,dt— terminate the debug session
DAP UI
Config file: lua/plugins/nvim-dap-ui.lua
nvim-dap-ui provides the scopes, watches and stack panels that open automatically when a debug session starts (wired up by the listeners above).
-- ~/.config/nvim/lua/plugins/nvim-dap-ui.lua
return {
  {
    "rcarriga/nvim-dap-ui",
    dependencies = {"mfussenegger/nvim-dap", "nvim-neotest/nvim-nio"},
  },
}
Key mappings: none (the panels open/close automatically with the debug session)
Debugging workflow
- Start the viewer (OCP Viewer or VS Code) so
get_port()has something to connect to. - Open your script in NeoVim.
- Toggle a breakpoint with
<F8>and start the session with<F5>. - Step through with
<F7>/<F6>. After each stop, the CAD objects in scope appear in the viewer, labeled with their variable names. Planes, locations and axes show too — name your build123d contexts so they get meaningful labels. - Terminate with
,dt.
Updates via Lazy
Run :Lazy to open lazy.nvim's management dialog — a floating window that is your single place to install, update and inspect every plugin in this guide.
The dialog opens on a status overview and has a row of single-key actions across the top. The ones you will use most:
I— Install any plugins that are listed inlua/plugins/but not yet on disk (this also happens automatically on startup).U— Update all plugins to the latest commit allowed by their spec, then rewrite thelazy-lock.jsonlockfile to the new revisions.S— Sync: install + update + clean in one step, so the installed plugins exactly match your specs.C— Clean: remove plugins that are on disk but no longer referenced.X— Restore: roll every plugin back to the exact revisions pinned inlazy-lock.json(your undo button after a bad update).L— show the Log of recent commits pulled in by the last update.H— open:checkhealthfor lazy.nvim.?— toggle the help pane listing every key.
A typical maintenance cycle is: open :Lazy, press U to update, skim the log, and — if something broke — press X to restore the previous lockfile state. Quit the dialog with q.
Because checker = { enabled = true } is set in lua/config/lazy.lua, lazy.nvim also checks for updates in the background and shows a small notification when plugins are out of date; :Lazy is where you then act on it. Commit your lazy-lock.json alongside the config to make the plugin set reproducible across machines.
Key bindings reference
The key bindings are defined in the sections
| Key | Area | Action |
|---|---|---|
,vs |
Viewer | Start the viewer |
C-\ C-n / Esc |
Window | Leave terminal mode |
C-w h/j/k/l |
Window | Move between windows |
F1 |
Tree | Focus tree |
F1 (in tree) |
Tree | Close tree |
e (in tree) |
Tree | Filesystem view |
g (in tree) |
Tree | Git status view |
b (in tree) |
Tree | Buffers view |
F2 |
Theme | Toggle light/dark |
F3 |
REPL | Open |
S-F3 |
REPL | Restart |
F4 |
REPL | Send block and move |
S-F4 |
REPL | Send block and stay |
,rf |
REPL | Focus |
,rh |
REPL | Hide |
F5 |
Debug | Continue |
F8 |
Debug | Toggle breakpoint |
F7 |
Debug | Step over |
F6 |
Debug | Step into |
,dt |
Debug | Terminate |
First launch. Start NeoVim once after creating the files; lazy.nvim installs all plugins and treesitter parsers, and mason installs the language servers. Restart NeoVim when it finishes.